Create a Simple assembly
Please always refer to Create an item to clearly understand their respective roles and codifications.
Little basic glossary:
Simple Item: Any line of materials, labor, and others that will display a quantity of itself in the grid. Also called "component".
Assembly: Grouping of simple items.
Variables: Represent the manually entered quantities and the result of the formula required for calculating simple items (area, linear feet, etc...)
Management and Description of an Assembly
This is where the portion of calculations specific to the project is found, depending on the compositions, conditions, restrictions, and other variables that incur costs.
The precise calculation details will generally be grouped into two types.
Ass1 (Deliverable or Parent) The main assembly that groups all the information to be provided to the specialized assemblies (Ass2 and others).
The name of the line represents a global composition (External Wooden Wall)
This line will accumulate the required results for the sub-assemblies under it.
The assembly groups the required sub-assemblies (A2) required.
Ass2 (Operation or Child) Sub-assembly by specialized stages.
This line contains the required variables provided by Ass1 for its own calculation and distribution.
This line contains, if required, the variables for the calculation of fasteners. FixNnPi or FixNbPi2 as needed and ALWAYS FixNbReq which will contain the calculation formula.
This line contains, if required, the calculation choice variables and ALWAYS Surf for surfaces which will contain the value used for calculation.
The assembly (A2) contains all components of any nature (framing, gypsum, insulation...) for cost estimation related to it’s specialized title.
Avant de commencer la création d'un assemblage il faut vérifier :
That there will be no duplicates, carry out a search with different possible names to be sure that an existing assembly does not already meet
To correctly determine the classification code according to the most intuitive quote section for search and the assembly level according to protocol.
Ex: 03A1 for a level 1 assembly in the Concrete section.
Think of the best possible description of the assembly
Clear, precise, concise, easy to read, according to the protocol
Promote an intuitive and logical description for future use.
Always include the Management unit in brackets () at the end of the description.
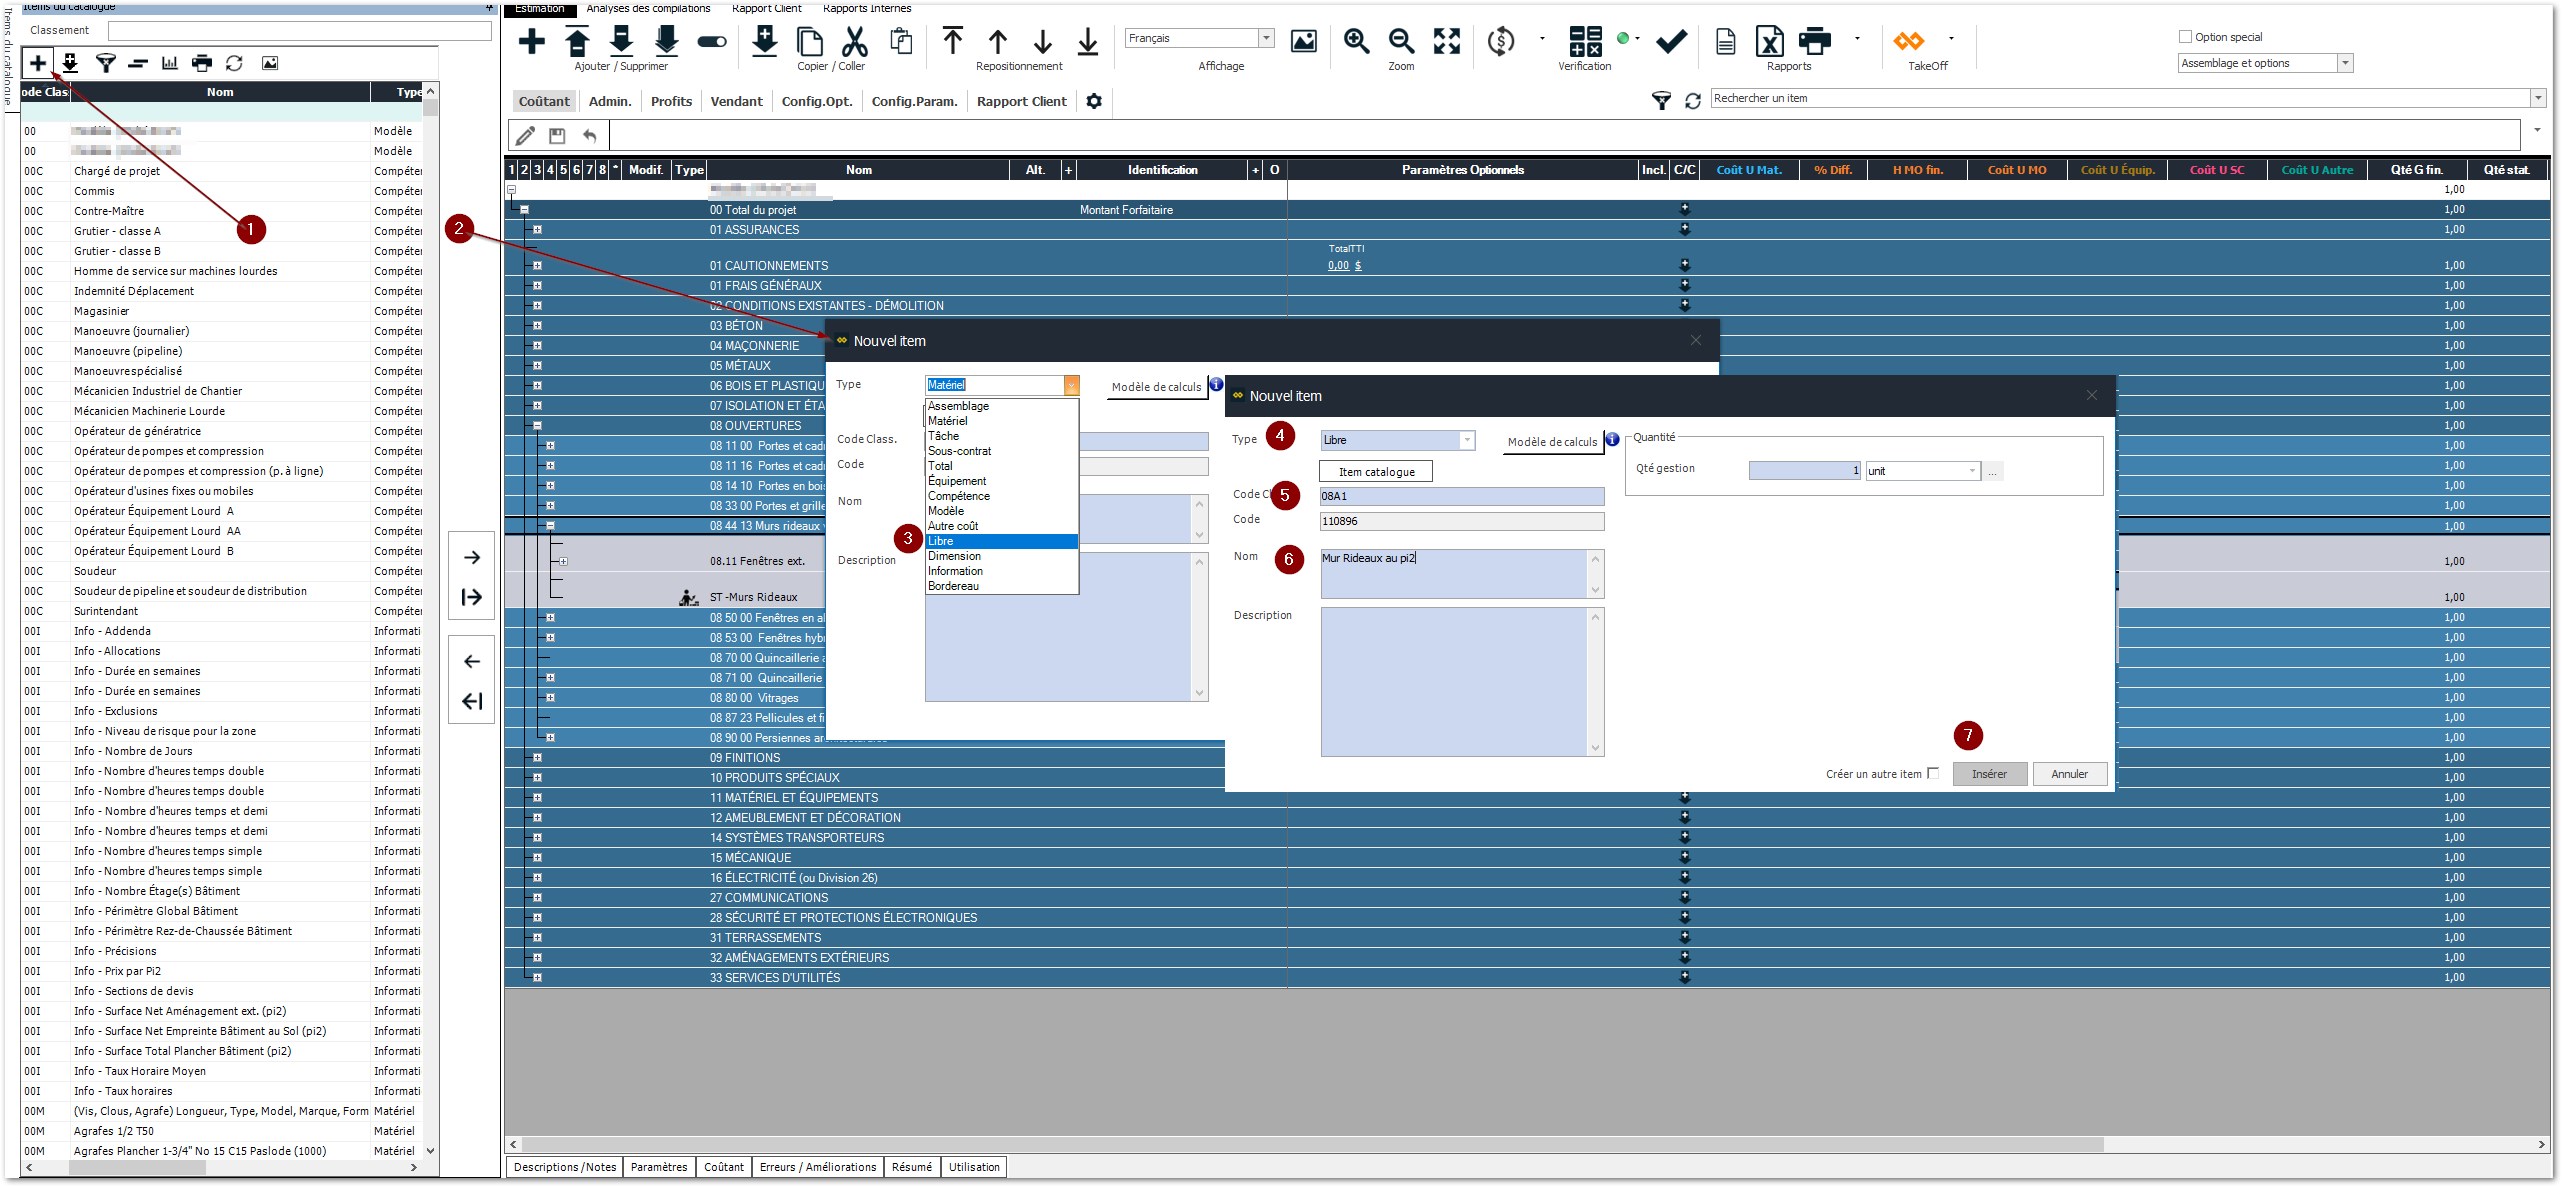
Creating an A1 assembly:
Creating the line:
Click on the + button at the top
In the window that opens,
Type: Select Libre
Make sure the Catalog Item button is in bold font
Classification Code: According to the reflection made as mentioned above
Name: According to the reflection made as mentioned above
Press on Create
Depending on the required level, some steps are crucial to facilitate what follows.
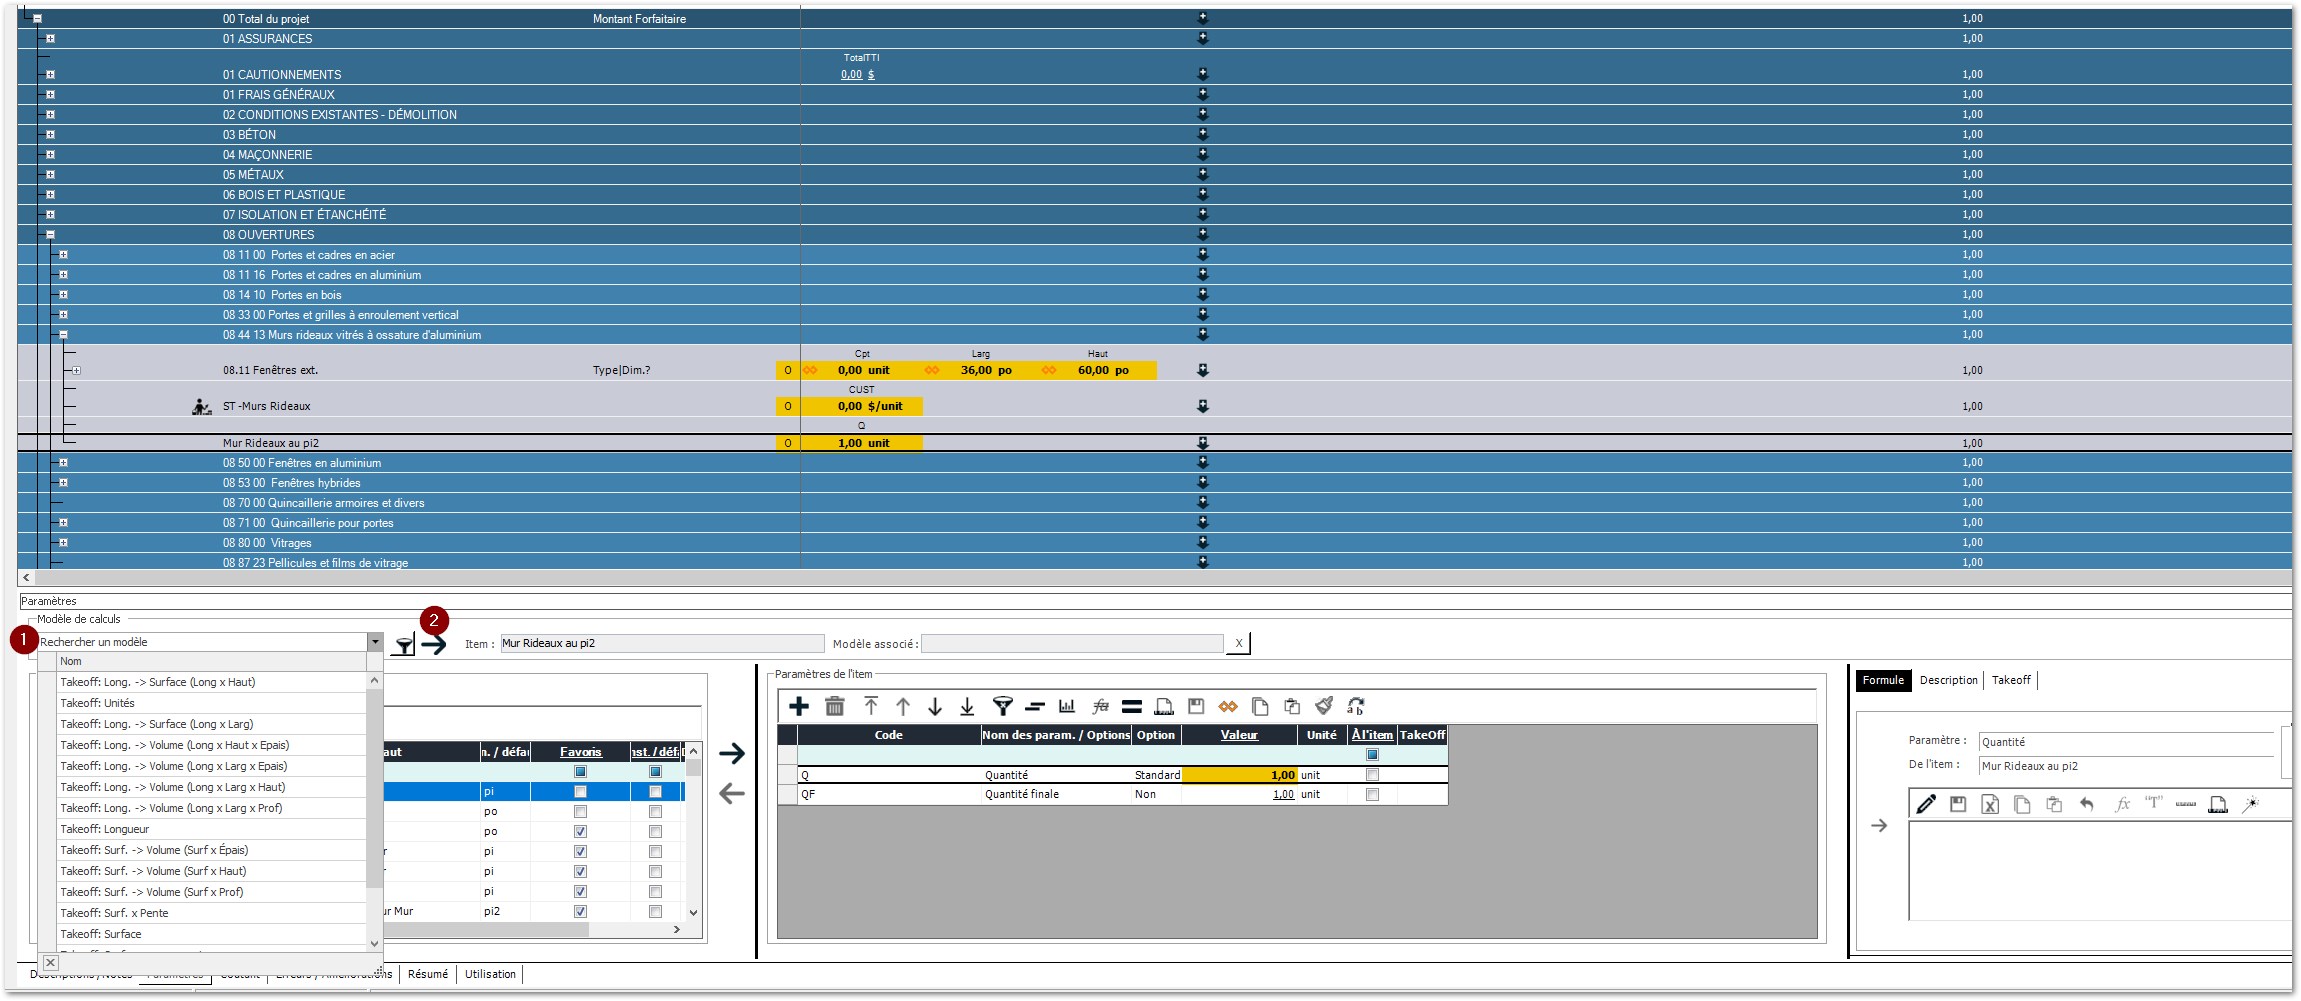
For a level 1 assembly (Ass1)
Create or integrate the required parameters for data entries.
Select the model corresponding to the estimation needs: Ex: Surface
Click on the arrow to insert all the required parameters.
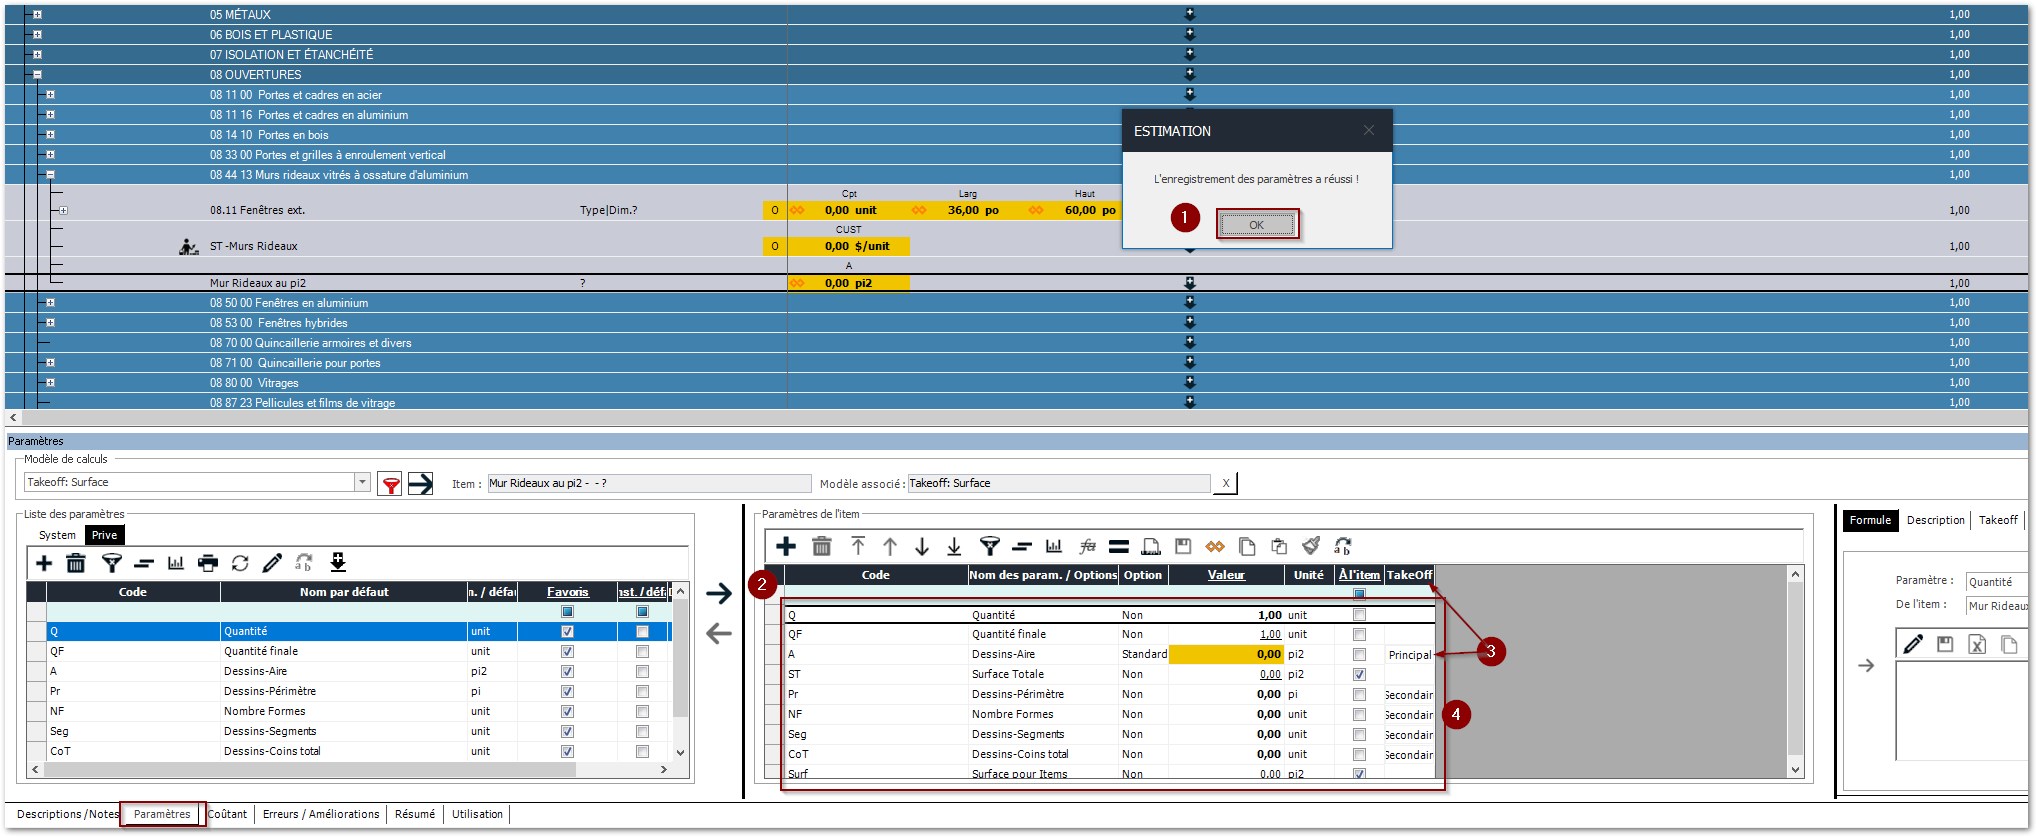
From the parameters tab
Click on OK to save your calculation parameters
Check the inserted parameters
Marker that will be exported to TAKEOFF (a manual entry can be performed if required)
Secondary markers: These are automatically calculated by TAKEOFF to obtain various results: number of corners, segments, and shapes.

Create and insert an item as needed (A2)
Select and Confirm
Put the formula in edit mode
Connect to its parent's parameter (A1)
Save
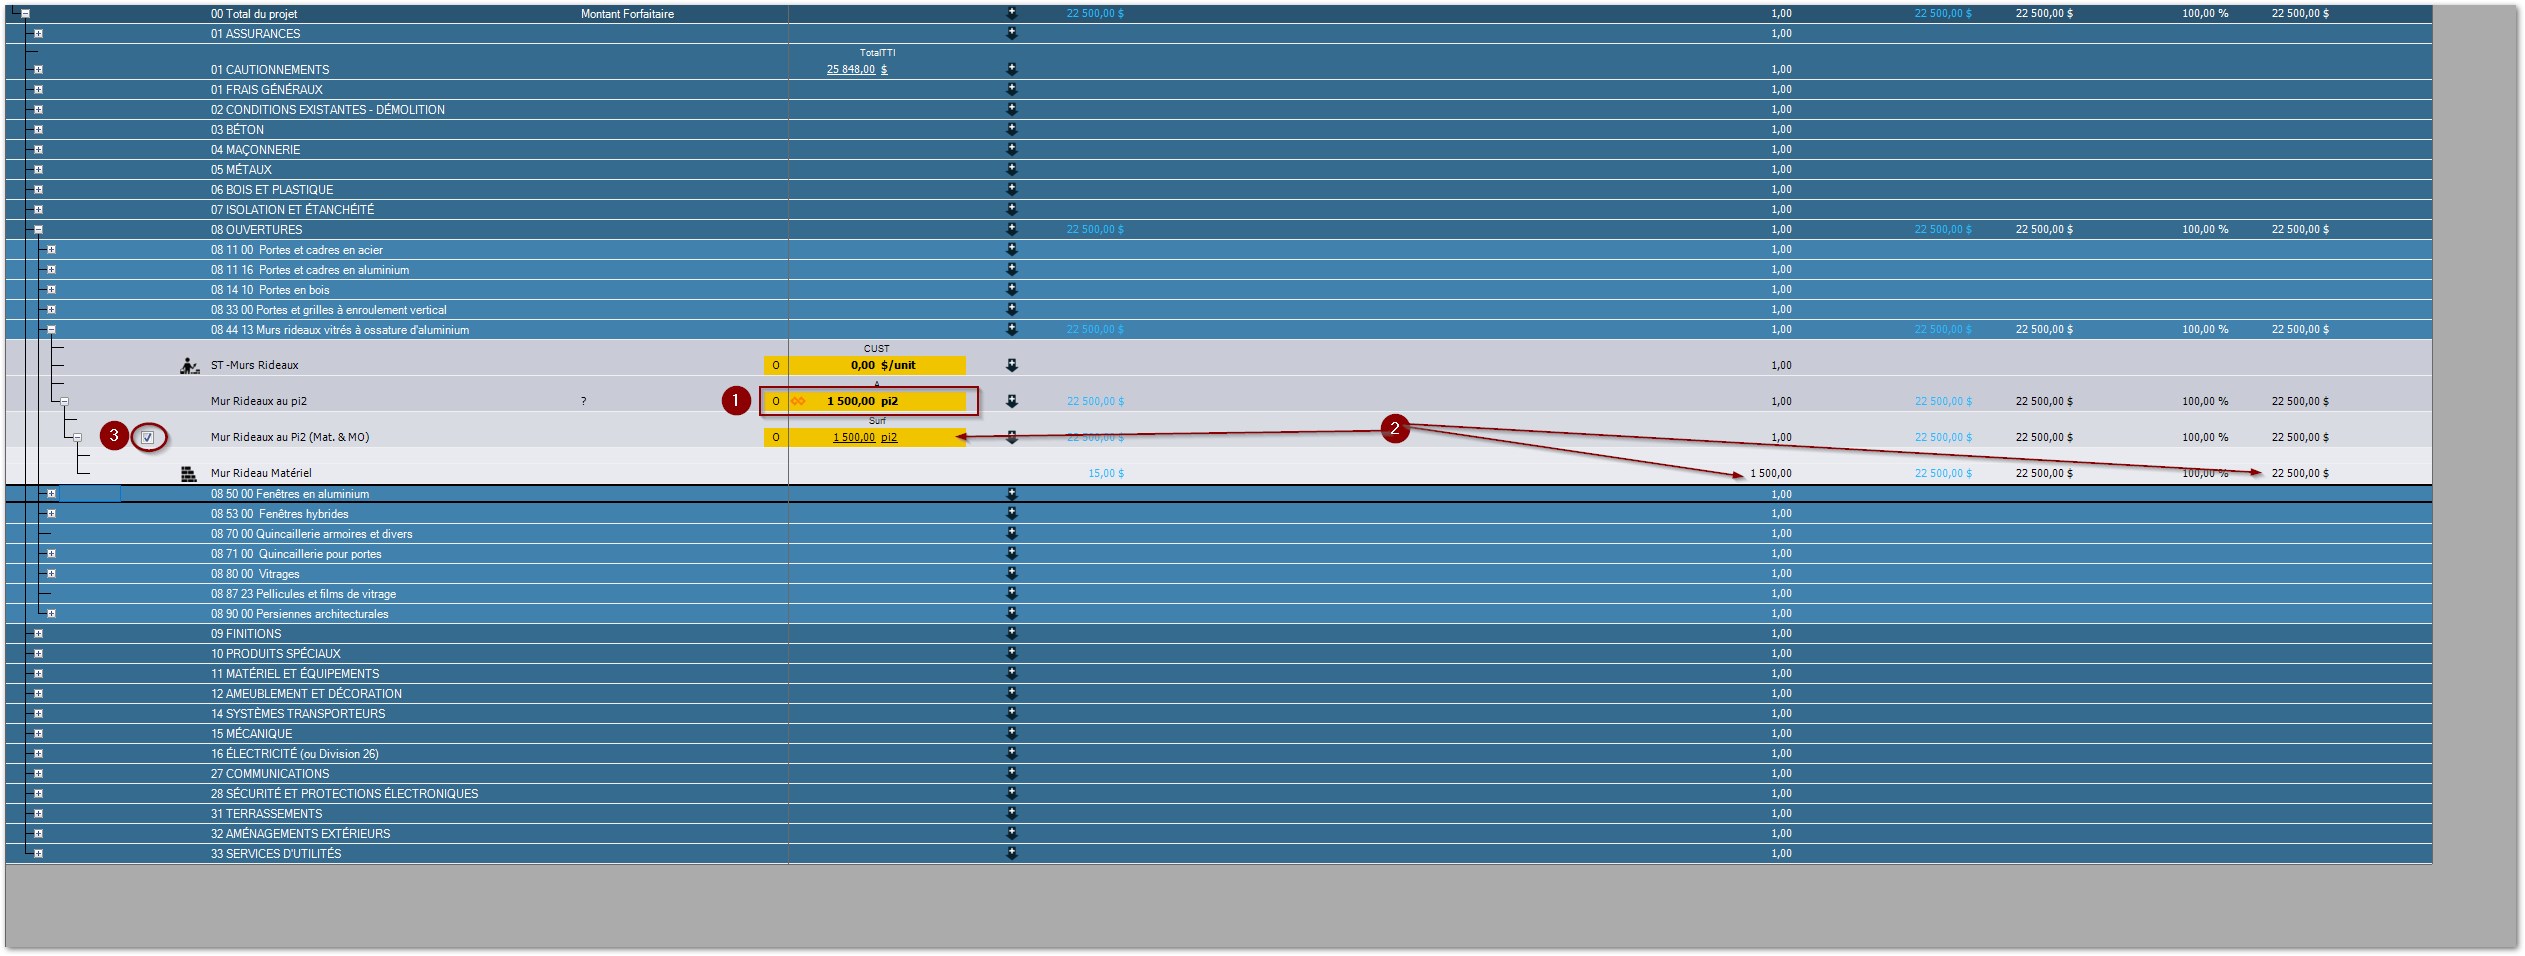
After inserting and connecting a material item
Test your model before exporting it to TAKEOFF by entering a value ex: 1500
Validate your calculations at lower levels
Reset the entered value to zero and finish the modification
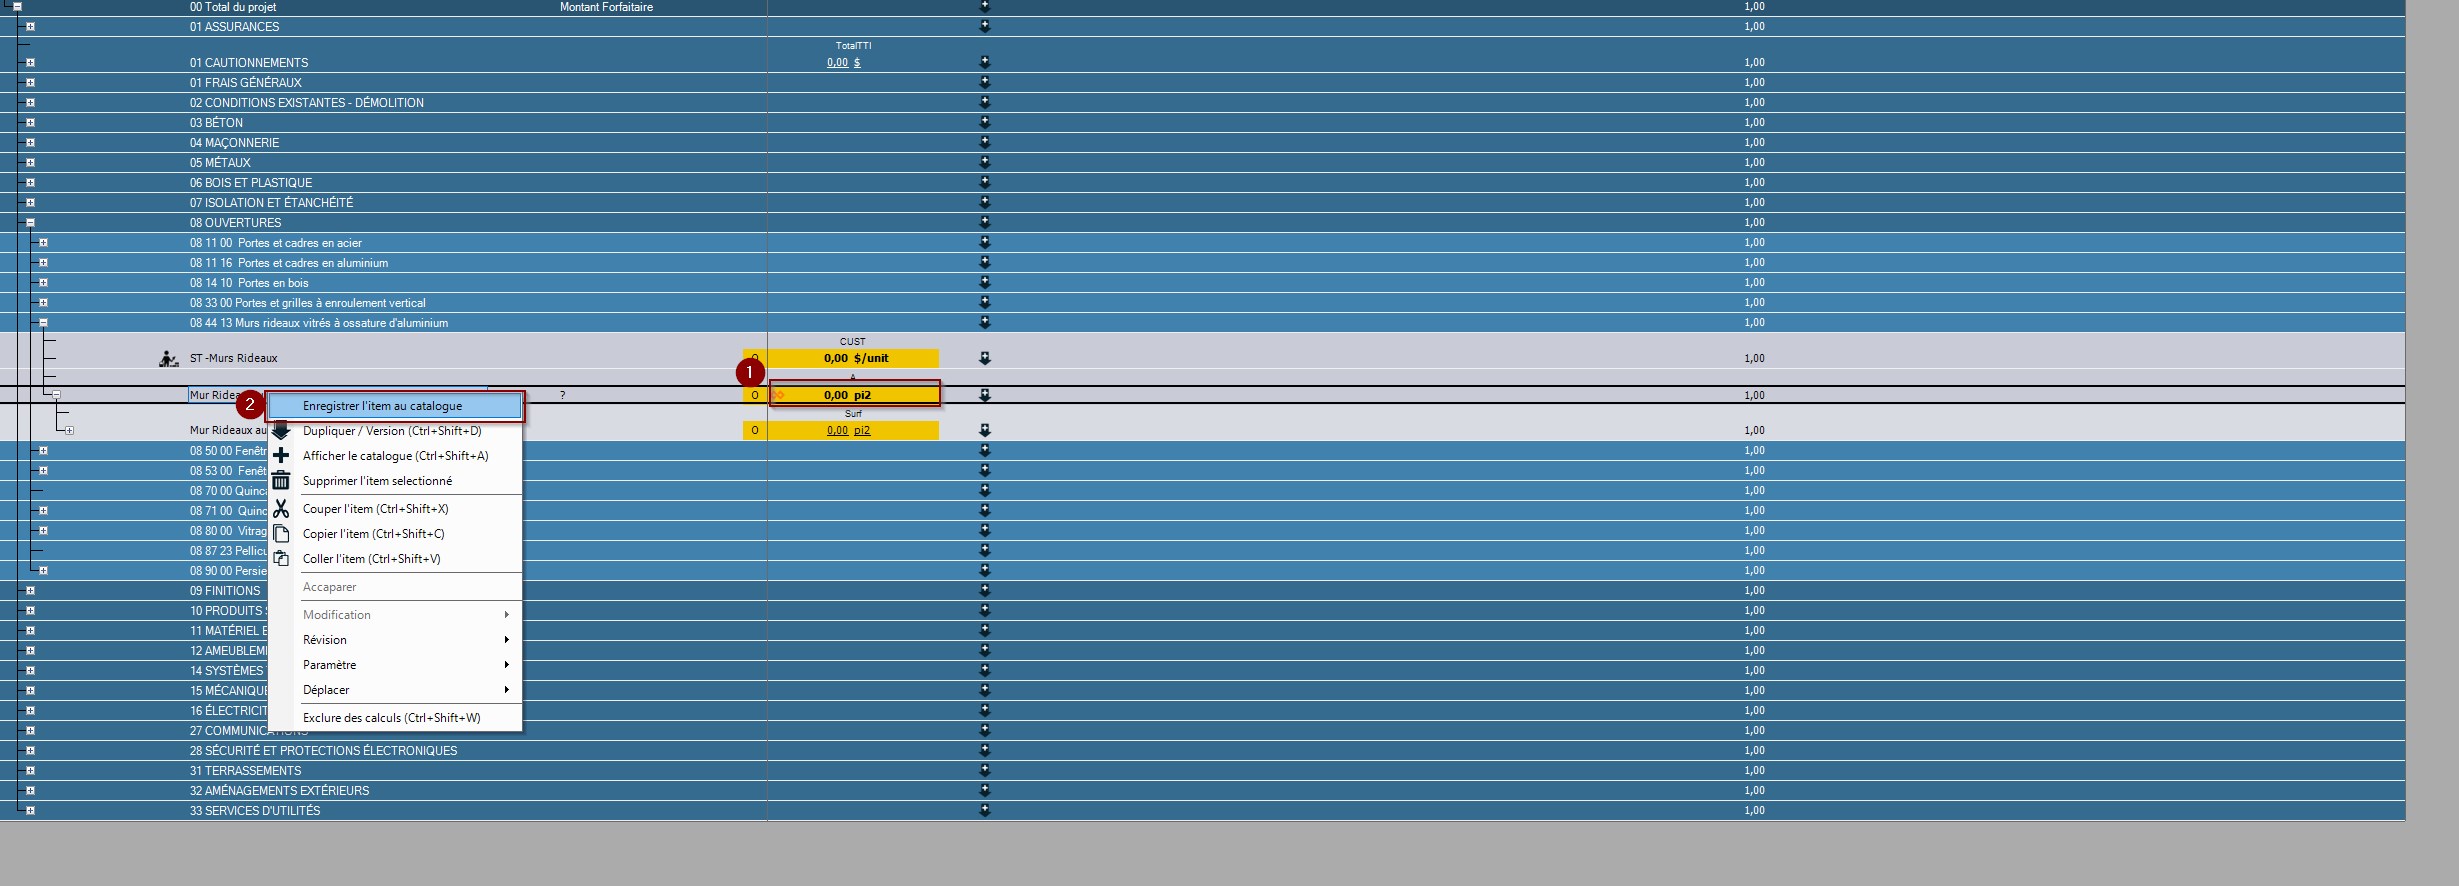
Ensure to reset the surface to zero
Select "Save the item to the catalogue" with the help of the right mouse button
Be careful to follow the next steps:
The use of the terms A1 and A2 at the correct steps
The selection of the right parameter type according to the assembly type and calculation need (linear, surface, and/or volume)
Follow the order of all variable parameters according to the protocole
It is recommended to establish a classification logic for parameters at the Ass1 and Dim1 levels to facilitate connections with the A2 sub.
Principle of standard codes
In level 1 assemblies (Deliverables) Coding of the assembly e.g.: 08A1
Coding of an Opening assembly 08 e.g.: Curtain Wall per square foot & A1 for a level 1 assembly
The parameters used will be predetermined calculation models based on three basic criteria: Object, Linear, and Surface.
Level 1 assemblies (Deliverables) can be entirely duplicated during the estimation process. They can then be adapted to conform to different compositions.
In level 2 assemblies (Operation), values are connected to the values of the A1 assembly. The use of the level 2 assembly is to perform an operation that contributes to the composition of a deliverable. Ex: Supply and installation of Curtain Walls e.g.: 08A2.
Coding of an assembly for the supply and installation of Curtain Walls: 08A2
The parameter used is Surf (surface)
Note: other specific parameters can be used e.g.: Perim (Perimeter)
It is possible to add operations (A2) in order to conform to different compositions.